Kindergarten Activity No. 69 : Water Play

It is time for some water play!

Children love water play. Apart from being fun, children find water play very calming.  Besides, water play helps children develop their fine motor skills and enhance their hand and eye coordination through various activities such as pouring, stirring, and squeezing.  Water play builds the foundation for understanding various Mathematical and Science concepts. It teaches children terms such as: half, full, less, and empty.

While doing these activities have discussions with your child. This enhances their social skills as well as their language skills. Use words such as basin, funnel, bucket, spoon, colander etc.

While doing the activities, stop and ask questions to your child since this will help them develop their thinking skills and problem-solving skills.

Filling containers with water

For these activities you will need:

  • Plastic water basin (or any other container)
  • Funnels
  • colanders
  • plastic bottles
  • cups
  • spoons
  • bottle caps
  • jumbo pipets
  • small watering can
  • small bucket
  • sponge
  • water wheel

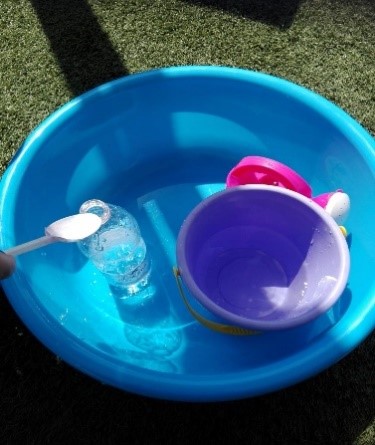
Activity 1: Filling a container with water

  1. Take a bucket and a container.
  2. Tell your child that you are going to use the bucket to fill the container with water.
  3. Before starting, encourage your child to estimate (guess) how many buckets of water does s/he think s/he needs to fill the container with water.
  4. While filling the container, count how many buckets s/he used.

Activity 2: Filling various containers with water

During this activity, your child has to transfer water from a container to another using different objects. For example, transfer water from a bottle to a watering can, or filling a bottle using a funnel.

During the activity ask your child questions like:

  • “Do you think that all the water in the bottle can go in the watering can?”
  • “Can you fill a cup using a spoon? Will it take longer if you fill it by squeezing the sponge?”
  • “Can you fill the bottle using caps? Will it be easier using the funnel?”

While doing this activity use mathematical vocabulary such as full, empty, half full, half empty, big, small, shallow, deep, more, less, many and few.
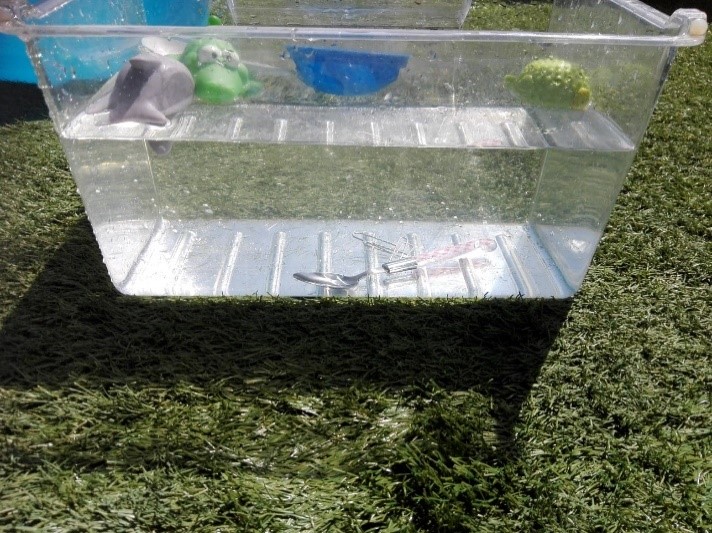
 

Float or Sink


Activity 3: Which objects float, and which objects sink?

For this activity you will need:

  • A metal spoon
  • A wooden spoon
  • A plastic spoon
  • Cloth/towel
  • Plastic toys
  • A sponge
  • A cork cap
  • A lollipop stick
  • A wooden ruler
  • A pebble
  • A small ball


  1. Start by explaining what the words float and sink
  2. Fill a container with water.
  3. Get all the objects you are going to use.
  4. Encourage your child to say the name of the objects one by one.
  5. Start the experiment by making predictions. Before throwing an object in the water ask your child if they think the object will float or sink.
  6. Throw one object at a time.
  7. Talk about why they think some objects sink and others float.
  8. Give them time to explore with different items.
  9. Discuss the weight, size, and material the object is made of and how this influences the floating ability.


During this activity encourage your child to use the following vocabulary:  soft, hard, wet, dry, heavy, and light. For example: “The cork cap is light, but the pebble is heavy”.


Watch the following float or sink videos:


https://www.youtube.com/watch?v=hCoDPhkE1Qc


https://www.youtube.com/watch?v=c8kszaZGLKE


Ms Pauline   Kinder1.3

Kindergarten Activity No. 68 : Shapes Recognition

Shapes recognition activity

Feed the Shape Monster game


Learning shapes helps the children identify and organize visual information, it also helps them learn skills in other curriculum areas including reading, Mathematics and science. For example, an early step in understanding numbers and letters is to recognize their shape.

In this activity we will help the children recognize and name the basic 2D shapes, while enjoying themselves and having fun.


For this activity you will need:

  • 4 big pieces of cardboard to make 4 Shape Monsters
  • Small shape cards
  • Paint
  • Googly eyes (or you can draw the eyes on the Shape Monster using a marker)
  • Glue
  • A pair of scissors
  • A marker

Preparing the Shape Monsters

  1. Paint each piece of cardboard in any colour you like. Use a different colour for each piece of cardboard to make 4 Shapes Monsters.
  2. Once the paint is dry cut each piece of cardboard in the following shapes: a circle, a square, a rectangle, and a triangle.
  3. Now cut a hole in each shape to represent the monster’s mouth. The shape of the mouth should correspond to the respective Shape Monster. For example, the circle Shape Monster should have a mouth cut in the shape of a circle.
  4. Once the mouth is cut, glue the googly eyes on each monster to make a proper shape monster with an open mouth.
  5. If you are not using googly eyes draw they eyes with a marker.


Preparing the small shape cut outs


Take the remaining pieces of cardboard and cut out small circles, triangles, rectangles, and squares from them.


Let’s feed the hungry Shape Monster


  • Mix up all the small shapes and put them in a tray.
  • Ask your child to take a small shape from the tray, say its name, and feed it to the corresponding Monster.


Enjoy

Ms. Anna

K1.2

Kindergarten Activity No. 67 : Mixing Colours

Colour Mixing

Critical thinking and problem-solving skills are the ability to understand cause and effect, figure out how things work, and solve problems. These skills are essential for academic success and for everyday life. They help us make good decisions, understand the consequences of our actions, and solve problems.

One way to enhance these skills is by having children experiment with colour mixing.

What do children learn from colour mixing activities?

  1. While observing the colours being blended together, making predications, comparing, and exploring cause and effect, the children will be enhancing their critical thinking skills.

Examples of questions you can ask to make children think are:

  • ‘what will happen if we mix red, blue and yellow together?’
  • ‘Can we make the exact same colour twice?’
  • ‘How much yellow do we need to add to the blue to make green, a little or a lot?


2. While experimenting to try to achieve a particular colour, children are using their problem-solving skills. Children use problem solving skills to come up with ideas for what they can do when the colour they are mixing does not turn out the way they hoped it to.


3. Familiarise themselves with mathematical concepts such as more and less.


4. Enhance their fine motor skills through, pouring and mixing, and work on controlling those skills. It’s not always easy to pour just a little bit of paint!


5. Hands on learning and experience with primary and secondary colours.


They will also learn that:

Mixing colours generates new colours

The Primary colours

The primary colours red, yellow, and blue are used to create all the other colours. (These three colours are unable to be created through mixing of any other colours).

By mixing the primary colours together, they create other colours such as orange, green and purple, also known as the secondary colours.

Red +yellow= orange      Blue +red= purple         Blue+ yellow= green


You can experiment further by mixing various colours such as, black and orange to make brown, red, and white to make pink and black and white to make grey.

Let the children experiment, explore, mix, and learn.

Once they are done mixing…let them PAINT!

Here you can find a well explained colour mixing video https://www.youtube.com/watch?v=ybt2jhCQ3lA

Ms Graziella

K1.1