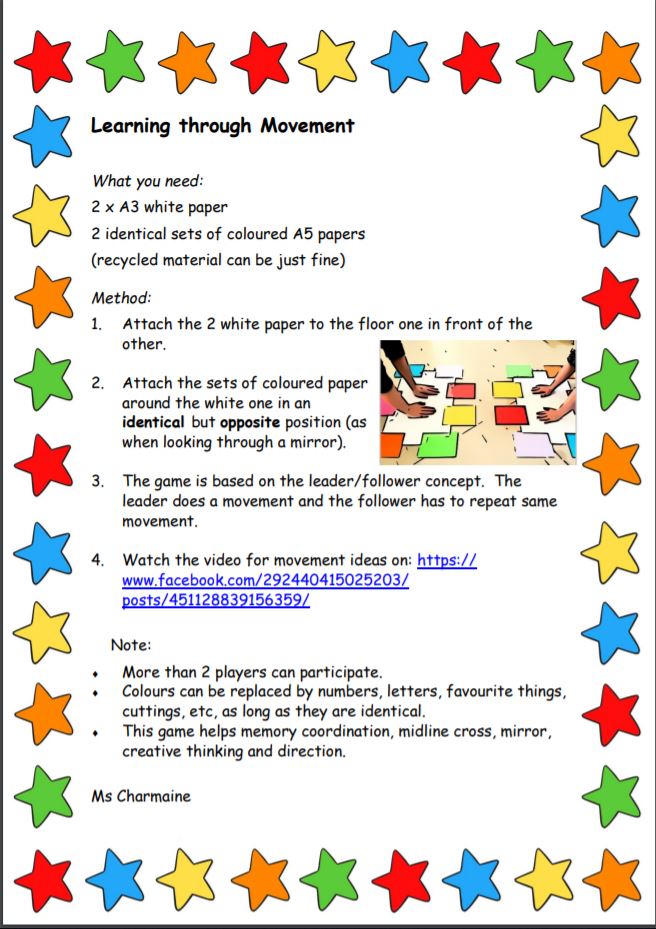
Kindergarten Activity No. 40 – A Science Experiment

Blubber Experiment

Before starting this experiment make a brainstorm activity with your child about the Arctic. Which animals live in the Arctic? How do animals manage to survive there? What keeps them warm?

photo credits: http://www.pexels.com

What is Blubber?

Many of our favourite animals live in the Arctic Ocean.  Temperatures in the Arctic are very cold.  But polar bears, whales, seals and penguins survive in this weather.  They manage to do so because they have blubber under their skin.  Blubber is sea animal fat. Animals like polar bears, apart from having a thick fur to keep them warm, they have a layer of fat under their skin which is called blubber. This blubber experiment will help children understand why these animals manage to live in such cold temperatures.


For this experiment you will need:(Before starting the experiment explain to your child that in this experiment the plastic bag will be the animal’s skin while the butter will be the blubber).


  • 2 Large bowls (large enough for a hand to fit in)
  • Ice Cubes
  • Cooking fat or butter
  • 2 plastic bags (large enough for a hand to fit in)
  • Duct tape
  • Food Colouring (optional)


  1. Fill 2 bowls with ice water. (You may add food colouring to the water).
  2. Take the two plastic bags. Fill one of the plastic bags with butter or fat (leave the other one empty).
  3. Ask your child to put his hand in the empty plastic bag and then put that same hand in the plastic bag filled with butter/fat.
  4. Seal the tops with duct tape so water can’t get into the bags.
  5. Make sure to move the fat around so that it covers the hand completely.
  6. Leave the other hand bare.
  7. Put the bowls filled with ice on the table. Ask your child to place both hands in the bowls. (Tell your child to take out his/her hands if it feels too cold).

Ask your child:

  • What do you notice?
  • Which hand is colder? (the one covered in fat or the bare one?)
  • Does the hand covered in fat feel the same as the bare hand?
  • What do you think is happening?
  • Why do animals who live in the Arctic need blubber?


IMPORTANT: Ask questions to make children think and help them arrive to the answer by themselves, rather than explaining everything yourself.   

Here is a link to a YouTube video showing and explaining this experiment

https://www.youtube.com/watch?v=_DQGAcqhkGs

Kindergarten Activity No. 39 – Healthy Eating

Learning about Healthy Food


Start this activity with a brainstorm activity. Ask your child to tell you a list of food they consider to be healthy.  (Their answers might surprise you!) Record his/her answers on a piece of paper.  When your child is ready, go through the list of food s/he has given you and discuss which of the food is healthy and which is not. Discuss the importance of eating healthy food regularly and unhealthy food occasionally.

Activity 1: Sorting healthy and unhealthy food

Aim: The aim of this activity is to teach your child about healthy food.  While discussing which food is healthy and which not your child is developing his/her reasoning skills and enhancing his/her vocabulary. Cutting the pictures will help your child enhance his/her fine motor skills.  The movement s/he makes to open and close the scissors (to cut the pictures) will help him/her build the tiny muscles in his/her palm and hand. It also enhances hand-eye coordination. This activity will also help your child develop categorization skills.

For this activity you will need:

  • Magazines
  • A pair of scissors
  • A blank sheet of paper
  • Glue
  • Markers

  1. Find some old magazines and search for pictures of any kind food. Under your supervision, encourage your child to cut the pictures using a pair of round edge scissors.
  2. Get the blank paper and draw a line to divide it into two columns, healthy and
  3. Sort the food pictures into two categories: healthy (food we must eat regularly) and unhealthy (I labelled the unhealthy food ‘sometimes’ to show children it is food we can eat occasionally).
  4. Stick the pictures onto the paper in the respective column. (As seen in the picture).

Preparing a healthy snack

Activity 2:  Preparing a fruit salad

For this activity you will need:

  • Different kinds of fruit
  • A chopping-board
  • A plastic knife or a butter knife.
  1. Help your child wash the fruit.
  2. If using a banana encourage your child to peel the banana skin him/herself and show them the proper way to cut fruit; holding the fruit with one hand while chopping with their dominant hand (the hand they use to hold a colour).
  3. Help your child cut the fruit (it is important to always supervise your child while cutting the fruit even thought you are using a plastic knife).


Aim of the activity: children love preparing food.  This helps them build their self-esteem. Using a knife improves hand control builds hand and arm strength and enhances fine motor skills.

Tip: You can use any fruit that is available at home. The ideal fruits that are soft to cut with a plastic/butter knife are bananas, grapes, strawberries, blueberries and oranges. These fruits vary in colour and have different vitamins.

Toast animal faces

Activity 2:  Preparing toast animal faces

For this activity you will need:

  • Sliced bread
  • Child’s favourite spread (peanut butter, chocolate spread, jam, etc.)
  • A plastic knife or a butter knife.
  • Chopped fruit


  1. Toast some pieces of bread.
  2. Encourage your child to spread the toasted bread with their favourite spread.
  3. Assemble the chopped fruit on the toast to make animal faces. This is a fun way to encourage fussy eaters to eat fruit.